Showing posts with label kids. Show all posts

Aug 28, 2012

It's Becoming a Blythe Obsession!

We might be out of control here on our love the Blythes!!
We have made a few more things and received some more since my last post!!

Kira and I finished our dress for Violet!!
It came out really cute!!
 I still need some work on gathering the skirt just right.  I felt like there was too much fabric for the skirt so I would make some changes next time.

I convinced my sister to make a quilt for Violet :)
She looks so comfy now!!

Kira got the CUTEST package from Becky and Eli with lots of cute miniatures for her Blythe!
(Thanks again my interweb friends!!!)
Kira loves to arrange the snacks out for Violet to eat.  She trades out the different pets for Violet to play with. You never know when Violet wants to play with Panda, Green Kitty or LPS Penguin!!
She hung up her school board and put a purse with it.
Kira squealed over this laundry hamper and small clothes pins!!
AND Now we have Harry Potter books for Kira and Violet!!!
I'm busy putting together each book and getting the pages just right!
Becky also sent Kira some Skull fabric!!
I made Kira another dress for Violet from the new fabric.
I also got adventurous and made Violet some PJ pants from this DIY I found on Pinterest.
This was actually a GREAT DIY that I plan to use for my kids!!!
Kira says I need to make her a sleep shirt next!!
I'll never be done!!

Until the sleep shirt is done she is wearing her skull dress with her PJ pants to bed! LOL
Kira got both her Blythes ready for bed - the littlest is from Littlest Pet Shops and her name is Sarah.
They look so cute all in their PJs!!!

Aug 6, 2012

Making a skirt for my girl

Kira has decided that she really loves skulls!!
(I need to post the pictures of skulls she keeps drawing!)
Saturday she saw this bundle of fabric at Joanns and asked if we could get it.
I gave in - I've had a long standing "no skulls" rule because I thought they were too creepy for my baby, but how can you deny skulls on pink fabric!?!?

Kira had some plans for the material that involved making pillows.
I convinced her today to make a skirt with the fabric after we looked at the skirt tutorials on Hickety Pickety and Venus de Hilo
We decided to use all of the fabric and make it into a patchwork style skirt!
This was an easy enough project that Kira could do most of the sewing on.  
Her new sewing machine from her grand-rat works great and is easy for her to use.

We had to add an extra panel of fabric because I miss calculated and it was going to be WAY small!
Thankfully we had enough extra fabric!!
I used the Hickety Pickety idea of the "no hem" skirt and loved how it turned out.  It added some length too and gave it a more polished look without me having to make a straight hem!!

We finished it in a few hours and she had a skirt right after lunch!
She LOVES it and wants to wear it on the first day of school!!!
This is Kira's favorite skull from all the fabric!!

Aug 2, 2012

Blythe Craziness!

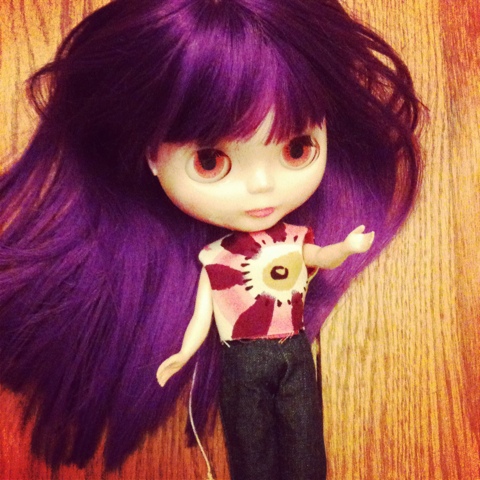
In June we got Kira her first Blythe/Basaak Doll.  She was so excited and wanted to get started right away on making outfits for her.  Kira has named her Violet because she thinks she looks like Violet from The Incredibles!
The first thing we did for Violet was give her some new hair.  Kira felt that since her name was Violet, she needed violet hair!!

We got this cute purple wig from Blythsim's Etsy shop.  It turned out PERFECT!  I just need to secure the hair better now so the wig doesn't come off so easily.


Last week Kira and I started our first dress for Violet.  We used the VERY helpful tutorial from Olivia on the OHstrumpets Blythes too! Blog.  Seriously it was VERY helpful!

We've only gotten to the bodice so far, but I'm hoping next week we'll get to the skirt too.
Kira did all the cutting and ironing.  She was a little nervous about sewing so I did this part.  I think she will be able to sew more on the skirt!
Kira picked really cute fabric from my collection!

Finally I knitted two hoodies for her from this pattern
The ROYGBIV came out perfect!  
I made this other one while we were on vacation with my cotton yarn I had.
This picture gives you a better idea of what the hoodie looks like.
Now I understand why gage is important!!!
The ROYGBIV was done with the recommended sock yarn and the green was done with some cotton yarn that was a little thicker, causing the hoodie to be A LOT bigger!!! It's huge on her! But Kira still loves it, so it doesn't really matter to me!!

We are sinking further and further into the Blythe world! Kira saw that you can change the makeup!! So I'll be researching that soon!!! 


Jul 20, 2012

Passing on the Craft

I love that my daughter shares my love for crafting.
She has always been a creative girl and I'm glad that she is wanting to learn how to crochet.
Of course she was also inspired when she saw that Becky's boy Eli was also crocheting friendship bracelets and was eager to start right away!
Kira has been a fast learner and took off with her chain stitches!
She made a bunch of friendship bracelets for her Girl Scout buds and for her pen pal Eli


Her first "project" was an armwarmer for her puppy!!!

Now she is trying her hand at sewing!!!!!

The world of crafting is wide open for her and I hope to encourage her in this area.
The world will be much happier with more crafty kids!
What kind of crafts are you teaching your kids??

Jun 14, 2012

Special Bear for a Special Friend

I LOVE the internets!!!!
One of the best thing about the internet is making friends through all the cool blogs, Instagram, twitter...

Well, one of the interweb friends I have made is Becky and I love following all her fun pictures on Instagram.
She has the cutest step-son Eli that is the same age as my daughter Kira and they have ended up becoming friends too - I'll have to share more about that!
Well Eli's Birthday was last month and Kira and I wanted to send him something special for his Birthday

I thought first of a party hat...

And then decided that a bear needs a party hat!!!
He turned out extra cute!!!!!!


Kira helped me decorate the shipping box too!!!

Becky let us know that Eli loved his bear :) YEAH!
I love being able to get Kira excited about making things for people, even when we haven't met them in person.  Also it helps get the an appreciation for the old fashion snail mail!! Who doesn't love getting real mail???

PS - You can see pictures of Eli with Teddy here!

May 1, 2012

What Time is it???


I don't know how we missed this cartoon until just now but we are all obsessed over it! It is currently the only thing that will get my son out of bed for school in the morning!!!

Since falling in love with this show my son has been asking me to make him a Finn hat. I found a pattern on Ravelry but it wasn't working out right, but it did get the ball rolling.


It turned out cute but still needs some work. I'm hoping to get it perfected soon as my daughter now wants a Fiona hat :)
My son loves it! He wore it all day Sunday, even during church! Silly guy!!

Jun 30, 2010

Monster Felt Money Holders


My son was telling me he needed a new wallet.
I wanted a fun place to keep my "mad" money for my new camera.
So I made these!!!
The green is mine, red belongs to my son and pink goes to the daughter.

Also, I figured out that for the last year or more I have had my camera's flash set to SUPER bright! I somehow set it to dimmer tonight and figured out how to change it!!!! So I'm glad to know I know how to use my camera better! I still want a new one though!!! We'll see though!!

Jun 14, 2010

I gave in...

I caved and joined in on the Owlness!!!
 

Aren't these just the cutest though????

I found the easy peasy pattern and watched several youtube videos on crocheting amigurumi and got going!
I made the blue one while watching Harry Potter last night -- Hedwig must have inspired me!


Since I have 2 kids, I can't just make one... so I finished the pink one up while at work today.


And for Marci -- OWL with a MUSTACHE!! Hee hee hee

Jun 6, 2010

Felt Monster Mash

Yesterday I went on a craft adventure with my friend Marci and my 5 year old daughter.  You can read more about the adventure on Marci's Blog.
We ended up at the Stitch Lab to get some felt.  
I was planning just to get one sheet for an idea I have for a project.
My daughter saw this monster and fell in love.


She insisted that I had to make her one.
Well I have a son too, so I would have to make him one.
So before I knew it I had 7 sheets of felt.

My first thought was "Making monsters won't be too bad! This should be an easy project!"

I let me kids design their monsters. 
My daughter wanted the exact one we saw at the Stitch Lab.
My son came up with this design.


I was actually able to do most of the sewing on my sewing machine!! I was pretty proud of this accomplishment.  Of course after I sewed my son's together I realized there was NO WAY I was going to be able to flip it inside out with the skinny skinny neck... I had to take some of it apart and the sew it back together by hand in some areas... this is what I get for letting the creative kid design his own monster!!!

But after 2 days of sewing, stitching, cutting, pulling apart, stuffing and decorating, this is the final products!

My son named his Knight Ninja and my daughter named hers Harper (like from the friend who designs things on Wizards of Waverly Place)

May 15, 2010

DIY Clipboard

My daughter and I had a nice girly day.  We did lots of hanging out but towards the end of the day she said she wanted to make a gift for her teacher.  At first she wanted me to knit her a bunny... I talked her out of that.  Then she thought we could decorate a clipboard for her since she uses them all the time.  GREAT IDEA!
  Before we went to get the supplies I found these awesome/easy instructions
I will say my almost 6 year old daughter has great taste and a good eye for awesome prints! She found this blue sparkly paper she wanted to use and we just went from there.  
Here are the supplies

We cut out the paper by tracing the clipboard on the wrong side and then cutting it out. I let my daughter put on the mod podge on herself.  We then placed the paper on one side.  We found that the paper didn't want to stick at first so we used some heavy items to help smooth the paper and help hold it down. 

After the paper was glued to each side we added ribbons to the clip.  Our clip board could actually come apart and that was nice at first, until I had to screw it back together... But I eventually did!

We added stickers to the back spelling out Ms. Moore's name.  We also put another finishing coat of mod podge on top of the paper and stickers to seal everything in.
It turned out pretty cute and we are both very proud!


Feb 28, 2010

"Slouch" Hat -- try and try again

Some how this post was never posted... blogger, why are you doing this???? This was from way back when.  I learned a lot from this project!

I was getting to the point to where I thought I was never going to get this hat right! First there was the simple problem that I was over thinking the pattern.  I was making it for my daughter so I thought I could just subtract a few cast on stitches from the adult pattern for the kid pattern since I couldn't find a kid pattern to my liking.  Then when I got halfway into it I realized it was A LOT smaller than I had planned.  I soon realized that I was using size 8 needles when the pattern called for size 10. Lesson #1 Always follow the needle size!!! or at least take notice of it before you get started!!  I had brief thoughts of just giving the hat to one of my younger second cousins but before I could complete the hat I ran out of yarn....

So then I decided to just start over, use the same size 8 needles, but follow the number of stitch numbers and such, figuring that smaller needles would make the pattern tighter and smaller... Tighter yes --- it didn't exactly turn out to be a slouch hat! ACK!!!!  But we added some pretty ribbon and I think it looks cute!


I got the pattern idea from here , but I made some changes to the pattern. 

So here is what I ended up really doing:
Yarn: Vanna's Choice Yarn- Rose Mist (Medium Weight)
Needles: size 8 US 16 in. circular, and set of size 8 US DPN

CO 68 sts using the circular needles
1. Work 2 X 2 rib for 2.5"
2. Knit all stitches while increasing by 12 stitches evenly (80 sts)
3. Knit all stitches while increasing by 8 stitches evenly (88 sts)
4. *K1, P1*
5. Purl all stitches
6. Repeat rows 4 and 5 until piece measures 5" from CO.

Decreasing Crown (switch to DPNs when necessary)
7. *P9, P2G* (80 sts)
8. *K1 P1*
9. *P6, P2G* (70sts)
10. *K1 P1*
11. *P5, P2G* (60 sts)
12. *K1 P1* (I switched the the Double Pointed Needles after the end of this row)
13. *P4, P2G* (50 sts)
14.  *K1 P1*
15. *P3, P2G* (40 sts)
16. *K1 P1*
17. *P2, P2G* (30 sts)
18.  *K1 P1*
19. *P1, P2G* (20 sts)
20. *K1 P1*
21. *P2G* (10 sts)
22. *P2G* (5 sts)
23. cut yarn, thread yarn through remaining stitches, pull tight and weave in remaining yarn.
Note: pattern within ** should be repeated